A damaged chimney crown can lead to serious problems for your home’s entire chimney system. At Haileys Pro Services, we’ve seen firsthand how neglecting this crucial component can result in costly repairs down the line.
In this guide, we’ll walk you through the process of repairing a chimney crown, from identifying damage to completing the repair. Whether you’re a DIY enthusiast or simply want to understand the process better, this post will provide valuable insights into maintaining your chimney’s health.
How to Spot Chimney Crown Damage
Visual Inspection: Your First Line of Defense
Start your chimney crown assessment with a visual inspection from the ground. Look for obvious signs of deterioration such as cracks, chips, or missing pieces. Use binoculars to get a closer look if possible. Focus on the edges of the crown, as these areas often suffer the most water damage.
Telltale Signs of Water Damage
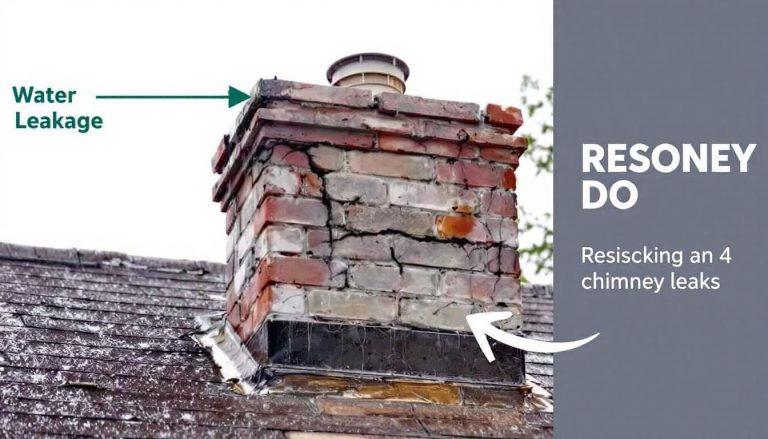
Water poses the greatest threat to chimney crowns. Inspect the chimney cap and crown regularly for signs of damage. Check your attic and the areas around your fireplace for water stains or dampness. These indicators suggest a compromised chimney crown. The Chimney Safety Institute of America reports that even small cracks allow water to penetrate, leading to more severe damage over time.
The Impact of Freeze-Thaw Cycles
Freeze-thaw cycles can devastate chimney crowns in colder climates. When the temperature drops, water freezes and expands, leading to crumbling mortar, spalling bricks, and cracked chimney crowns. This process repeats, causing significant damage over time. Residents in areas with harsh winters should check their chimney crown thoroughly after the cold season ends.
Professional Inspection: Expert Eyes for Hidden Issues
While DIY inspections provide a good starting point, professional assessments offer unparalleled thoroughness. The National Fire Protection Association advises annual chimney inspections. A certified chimney sweep can identify issues invisible from the ground and provide a comprehensive evaluation of your chimney’s health.
Common Causes of Chimney Crown Deterioration
Several factors contribute to chimney crown damage:
- Age and weathering
- Poor initial construction (using subpar materials or techniques)
- Lack of regular maintenance
- Extreme temperature fluctuations
- Chemical exposure (from rain or air pollution)

Understanding these causes helps homeowners take preventive measures and spot potential issues early.
The next step in maintaining your chimney’s health involves gathering the right tools and materials for repair. Let’s explore what you’ll need to tackle chimney crown repair effectively.
Essential Tools and Materials for Chimney Crown Repair
Safety Equipment: Protecting Yourself
Safety should be your top priority when working on a roof. A sturdy ladder, non-slip shoes, and a safety harness are essential. Wear safety goggles to protect your eyes from debris and dust, and use a respirator mask to avoid inhaling harmful particles. Heavy-duty work gloves will protect your hands during the repair process.
Cleaning Supplies: Preparing the Surface
Before you start repairs, you must clean the chimney crown thoroughly. A wire brush is invaluable for removing loose mortar and debris. A shop vacuum with a HEPA filter will help collect dust and small particles. For stubborn stains or moss, a pressure washer can be effective (but use it cautiously to avoid further damage).
Repair Tools: The Core of the Job
For the actual repair work, you’ll need various tools. A hammer and chisel are necessary for removing damaged sections of the crown. A trowel will help you apply and smooth out patching materials. For mixing repair mortar, you’ll need a bucket and a mixing paddle attachment for your drill.
Repair Materials: Choosing the Right Products
Hydraulic cement is time-tested and still preferred by many sweeps for patching small cracks and holes. For larger repairs or rebuilding, use a pre-mixed mortar specifically designed for chimney crowns. These specialized mortars often contain additives that enhance durability and water resistance (which is crucial for long-lasting repairs).
Waterproofing Products: The Final Step
After repairs, applying a waterproof sealant is important. Look for a breathable sealant specifically formulated for masonry. You’ll need a brush or roller for application, and don’t forget to have paint thinner on hand for cleanup.

While DIY repairs can save money, complex chimney crown issues often require professional expertise. If you’re unsure about tackling the repair yourself, contact a certified chimney specialist. Now that you have your tools and materials ready, let’s move on to the step-by-step guide for repairing your chimney crown.
How to Fix Your Chimney Crown
Preparing the Damaged Area
Clean the chimney crown thoroughly. Use a wire brush to remove loose debris, mortar, and vegetation. A pressure washer can help with stubborn dirt (but use caution to avoid further damage). Inspect the crown closely for hairline cracks or minor chips that debris may have hidden.

Use a chisel and hammer to remove loose or damaged sections of the crown. Take care not to damage surrounding areas. After chiseling, use a shop vacuum to remove all dust and loose particles. This step ensures proper adhesion of repair materials.
Fixing Small Cracks and Chips
For minor damage, apply a layer of bonding agent to the affected area with a brush. This helps the patching material adhere better. Mix a small batch of hydraulic cement according to the manufacturer’s instructions. Apply the cement to cracks and chips with a trowel, pressing firmly to fill the entire damaged area.
Smooth the surface of the patched area to match the existing crown. Allow the cement to cure for the time specified by the manufacturer (typically 24 to 48 hours). Protect the repaired area from rain and direct sunlight during this time.
Rebuilding Severely Damaged Crowns
If your chimney crown has extensive damage, you may need to complete a rebuild. Remove the entire damaged crown down to the top of the chimney structure. Clean the area thoroughly and apply a layer of mortar to create a solid base.
Form the new crown using a specialized chimney crown mix. Chimney crowns should be made using cement, not mortar. Shape the crown with a slight slope away from the flue to ensure proper water runoff. The crown should extend at least two inches beyond the edge of the chimney on all sides.
Use a trowel to smooth the surface and create a drip edge around the perimeter. This edge helps water drop off instead of running back towards the chimney. Allow the new crown to cure for at least 48 hours. Keep it covered and moist during this time to prevent cracking.
Waterproofing for Long-Term Protection
Once repairs are complete and fully cured, apply a waterproof sealant to the entire chimney crown. Choose a breathable sealant specifically designed for masonry. Apply the sealant with a brush or roller, ensuring complete coverage. Pay extra attention to the edges and any joints where the crown meets the flue.
For optimal protection, apply two coats of sealant. Allow the first coat to dry completely before applying the second. This extra step significantly extends the life of your repair work and helps prevent future water damage.
Working on a roof can be dangerous. If you’re not comfortable with heights or lack the necessary experience, contact a professional chimney service. They have the expertise and equipment to safely and effectively repair your chimney crown, ensuring your home’s protection for years to come.
Final Thoughts
A well-maintained chimney crown protects your home from water damage and extends the life of your entire chimney system. Regular inspections and timely repairs prevent costly damage and ensure the safety of your home. A properly functioning chimney crown keeps moisture out, reduces the risk of structural damage, and helps maintain the efficiency of your fireplace or heating system.

DIY enthusiasts can handle minor repairs, but complex issues require professional help. Extensive damage or work that requires specialized equipment should be left to experts. If you’re unsure about the extent of the damage or your ability to safely complete the repair, consult a professional.
Haileys Pro Services offers thorough inspections, expert repairs, and ongoing maintenance for your chimney crown (and entire chimney system). Our experienced technicians provide comprehensive services to keep your chimney in top condition. Don’t wait for visible signs of damage – make chimney crown maintenance a regular part of your home care routine.