At Haileys Pro Services, we know that a well-maintained chimney is crucial for home safety and efficiency. Repointing your chimney breast is a vital task that often goes overlooked by homeowners.
This guide will walk you through the essential steps of chimney repointing, from recognizing when it’s needed to completing the job effectively. Whether you’re a DIY enthusiast or considering professional help, understanding this process is key to preserving your chimney’s integrity.
Why Repoint Your Chimney
Understanding Chimney Repointing
Chimney repointing is a critical maintenance task that preserves your home’s safety and efficiency. This process involves the removal and replacement of deteriorated mortar between bricks or stones in your chimney. Repointing maintains the structural integrity of your chimney and prevents water damage to your home.
Identifying Repointing Needs
Recognizing when your chimney requires repointing is essential. Watch for these key indicators:
- Crumbling or missing mortar between bricks
- White staining on the chimney exterior (efflorescence)
- Loose bricks or stones
- Water stains on interior walls near the chimney

The presence of any of these issues signals the need for repointing. Annual chimney inspections help catch these problems early.
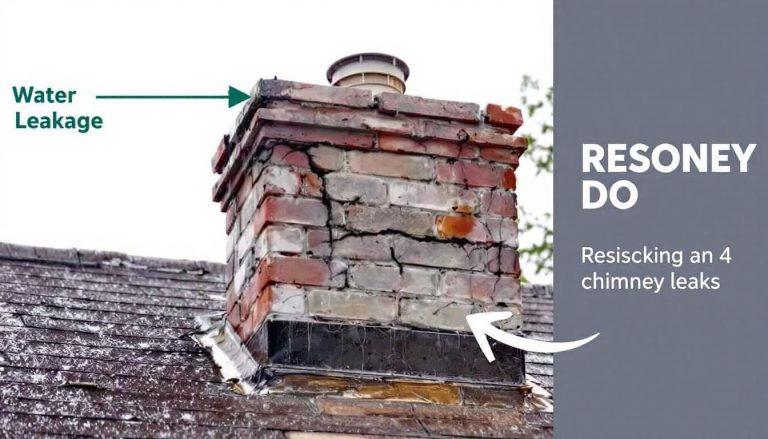
Risks of Delayed Maintenance
Postponing necessary repointing can result in severe consequences. Water infiltration stands as the primary concern, potentially causing extensive damage to your home’s structure. In colder climates, water that penetrates cracks can freeze and expand, further compromising the chimney’s integrity.
A study by the Chimney Safety Institute of America identified water damage as the leading cause of chimney deterioration. This fact underscores the importance of timely repointing to avoid costly future repairs.
Advantages of Timely Repointing
Repointing your chimney offers several valuable benefits:
- Enhanced structural integrity
- Improved energy efficiency
- Prevention of water damage
- Increased property value
The National Association of Realtors reports that a well-maintained chimney can recoup approximately 70% of its remodeling costs, making repointing a smart investment in your property’s future.
Professional vs. DIY Repointing
While skilled homeowners might attempt DIY repointing, professional services often yield superior results. The repointing process requires careful removal of old mortar, thorough cleaning of the joints, and precise application of new mortar. Proper technique ensures the new mortar bonds correctly and resists premature cracking.
Professional chimney services (like those offered by Hailey’s Pro Services) use high-quality materials and proven techniques to ensure long-lasting results. Expert assessment of your chimney’s condition allows for tailored solutions to address specific issues.
As we move forward, let’s explore the essential tools and materials needed for a successful chimney repointing project.
Essential Tools and Materials for Chimney Repointing
Safety Equipment: Your First Line of Defense
Safety must take precedence when repointing a chimney. A sturdy ladder or scaffolding provides secure access to the work area. Protect your lungs with a dust mask or respirator, and shield your eyes with safety goggles. Heavy-duty work gloves safeguard your hands from rough masonry materials and tools.
Masonry Tools: Precision Instruments for the Job
The repointing process requires specialized masonry tools. A pointing trowel applies new mortar to the joints. Use a joint raker or a grinder with a masonry wheel to remove old mortar efficiently. A wire brush cleans out loose debris from the joints before applying new mortar.

A hammer and chisel set removes stubborn old mortar or damaged bricks. Include a margin trowel for mixing small batches of mortar and transferring it to your pointing trowel.
Mixing and Application Materials: The Core of Repointing
Type N mortar (recommended for most chimney repointing jobs due to its medium compressive strength) forms the foundation of your repointing work. It’s composed of one part Portland cement, one part lime, and six parts sand. A mixing bucket and a mixing paddle attachment for your drill ensure proper mortar preparation.
For precise mortar application, consider using a mortar bag (especially useful for tight joints). A jointing tool creates a smooth, finished look in the new mortar joints.
Additional Helpful Items: The Finishing Touches
A spray bottle filled with water dampens the joints before applying new mortar, ensuring better adhesion. Tarps or drop cloths protect surrounding areas from mortar drips and debris.
Don’t underestimate the importance of proper cleaning supplies. A stiff-bristled brush and a bucket of clean water help you clean up any mortar spills on the bricks before they set.
With these tools and materials at your disposal, you’ll be well-equipped to tackle your chimney repointing project. However, if you feel uncertain about your ability to complete this task safely and effectively, consider seeking professional assistance. The next section will guide you through the step-by-step process of repointing your chimney.
How to Repoint Your Chimney
Preparing Your Work Area
Set up a stable work platform. For single-story homes, use a sturdy ladder. For taller structures, install scaffolding. Cover the roof area around the chimney with tarps to catch debris and protect your shingles.

Inspect the chimney thoroughly. Look for loose bricks, damaged flashing, or signs of water damage. Address these issues before you start repointing. Take photos for reference and to track your progress.
Removing Old Mortar
Use a grinder with a diamond blade to remove the old mortar to a depth of about 3/4 inch. This depth ensures a strong bond for the new mortar. Work slowly and steadily to avoid damaging the bricks.
After grinding, use a chisel and hammer to remove any remaining loose mortar. Clean out the joints thoroughly with a wire brush. Vacuum or use compressed air to remove all dust and debris.
Mixing New Mortar
Mix your mortar according to the manufacturer’s instructions. For most chimneys, Type N mortar is appropriate. It is rated for 750 psi, which is suitable for many chimney applications. Try to achieve a consistency similar to peanut butter (not too wet, not too dry).
Applying New Mortar
Before you apply new mortar, dampen the joints with a spray bottle. This prevents the bricks from absorbing moisture from the new mortar too quickly. Use a pointing trowel to pack the new mortar tightly into the joints. Work in small sections to ensure the mortar doesn’t dry out before you can finish it.
Finishing and Curing
Once you fill a section, use a jointing tool to smooth and shape the mortar. This improves appearance and helps shed water. Clean any excess mortar from the brick faces immediately with a damp sponge.
Allow the new mortar to cure for at least 24 hours. During this time, protect it from direct sunlight, wind, and rain. Mist the repointed areas lightly with water several times a day for the first three days to ensure proper curing.
Repointing a chimney is a challenging task that requires skill and patience. For optimal results and safety, many homeowners choose to work with professionals. Experienced technicians (like those at Hailey’s Pro Services) ensure your chimney is repointed correctly, extending its lifespan and maintaining your home’s safety.
Final Thoughts
Repointing your chimney breast requires careful preparation, the right tools, and attention to detail. We recommend annual inspections to identify potential problems before they escalate. Our experienced technicians can spot subtle signs of wear that might escape the untrained eye, ensuring your chimney remains in top condition.

A well-maintained chimney functions more efficiently and adds value to your home. It prevents water damage, improves energy efficiency, and enhances overall safety. Timely repointing and regular upkeep protect your property and ensure peace of mind for years to come.
Haileys Pro Services offers comprehensive solutions for chimney repointing and other home maintenance needs. Our team specializes in chimney care, plumbing repairs, and a wide range of handyman services (both residential and commercial). Trust us to keep your home safe, efficient, and well-maintained.